| Quick Tip: Uniform Stroke Scaling Posted: 27 Oct 2010 07:00 AM PDT
When an illustration contains strokes of varying sizes it may not be immediately obvious how to scale all the strokes (larger or smaller) and still keep the illustration the same size. This Quick Tip will show you how! IntroductionBelow, observe how the car graphic is comprised of strokes that have a variety of thickness. The bottom image was created using the top image.
 Step 1Select your artwork and go to Object > Transform > Scale. It doesn’t matter if you use the Uniform or Non-Uniform option. If you select Non-Uniform make sure to enter the same value in both fields. Depending upon whether you want your object to have smaller or larger lines will dictate if you scale larger or smaller. We want our lines to appear thicker so we’ll scale to 50% of the original size. Make sure the Scale Strokes & Effects option is unchecked. Click OK. 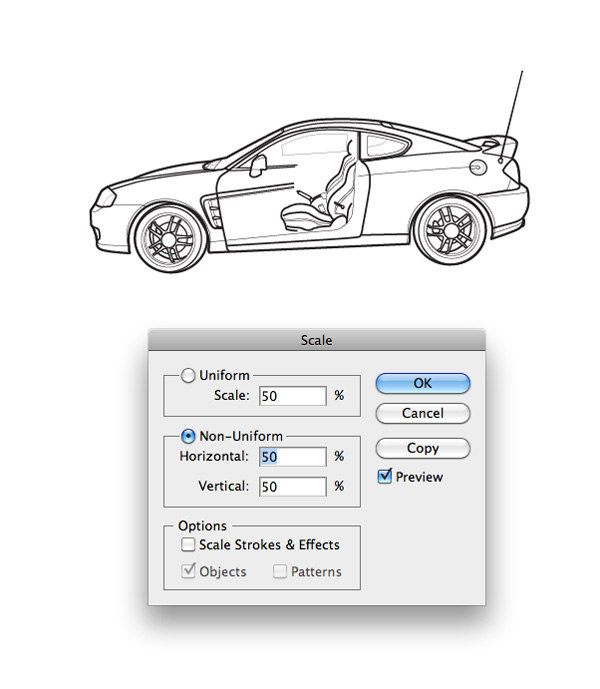 Step 2Go back to Object > Transform > Scale. This time make sure to select Scale Strokes & Effects. Enter 200 for the scale amount and click OK. Note, the amount you enter needs to return your image to the original size that you scaled it from, so, 200 works for our purposes but if you scaled your original image to an amount other than 50% then you won’t use the value 200.  ConclusionThat’s all! Now, all the strokes in your object are increased and the object is still the same size! |
| How to Draw a Fall Leaf Using Adobe Illustrator Posted: 27 Oct 2010 05:00 AM PDT
During this tutorial we will learn to create a vector autumn leaf and the universal texture of a leaf. You will learn to use the following techniques in practice: Live Trace, Art Brush, Mesh and many others. The tutorial contains lots of practical advice and recommendations. The seamless leaf texture can be used in your future works as an element of a design. Learn more at the jump! Step 1Maple leaves have the most beautiful leaf shape. A fall maple leaf is what we are going to create. Pick a leaf picture to work from, I decided upon this one. Copy the image to your hard drive, now run Adobe Illustrator and paste the image in the document (File > Place …)  Step 2Lock the under layer with the maple leaf image, in order not to move it accidentally when you manually trace its shape. Take the Pen Tool (P) and outline the leaf shape. Don’t be way too accurate, nature creates leaves of unique shapes.  Step 3Now create veins on the leaf. It’s more convenient to apply the Art Brush to this artwork. Let’s create a brush. Take the Rectangle Tool (M) and create a rectangle of 3 pixels in height and of an arbitrary width. Transform the rectangle into an isosceles triangle by adding an anchor point to the center of the right side and removing two vertexes: the upper right and the lower right. Perform all the operations using the Pen Tool (P).  Keep the shape selected, drag it to the Brushes palette, and choose the Art Brush in the open dialogue box.  Step 4Take the Pen Tool (P) and create curves with no fill and a 1 pixel stroke towards the direction of the main veins of the leaf. The line ends should lie beyond the outlines of the leaf, as you can see in the picture below.  Step 5Group up all the created curved lines, copy and paste them in front. We will need this group of lines for further constructing. Lock the under layer with this group for now and make it invisible in the Layers palette.  Also make a duplicate of the leaf shape, lock this under layer and make it invisible. We will need this shape when we trim the texture of the leaf according to its shape. All the built lines should come from a single point, though it is not like that for now.  Take the Lasso Tool (Q) and select the basic anchor points of all the lines, now go to Object > Path > Average and choose Both in the dialog box.  Step 6Select all the curves and the leaf shape, click on the Divide button from the Pathfinder palette. As a result of this operation, we have divided the shape of a leaf into pieces, one of each we will fill with different gradients to add more volume to the leaf.  It happens often when you divide objects of irregular shape, there appears plenty of extra pieces. There are two of them in our case. Select them in the Layers palette, and delete them by hitting the Delete button.  Now we have eight pieces of the leaf.  Step 7Unlock the under layer with a group of lines and make it visible (see step 5). Now apply the Art Brush, created in step 3, to these lines.  If some of the veins are wrongly directed, take the Pen Tool (P) and click on the end of this line, and the direction of the brush will change to the opposite one. Step 8Now create smaller veins, using the same brush, veins width can be varied by changing the thickness of the line in the Stroke palette.  Select all the veins and go to Object > Expand Appearance, then click on the Unite button from the Pathfinder palette.  Step 9Now we’ll color our leaf in fall colors only using linear gradients, consisting of two colors: yellow (C = 0; M = 28; Y = 96 and K = 0) and orange (C = 0; M = 65; Y = 100 and K = 0). Apply this gradient to each element of the leaf, adjusting it to obtain the result shown in the figure below.  In order to make the colors look clean and bright, shades of yellow should not contain touches of blue and black colors, so do C = 0 and K = 0 in both colors. Step 10Fill the veins with a radial gradient that goes from green (C = 75; M = 0; Y = 100 and K = 31) to an orange color (C = 0; M = 63; Y = 100 and K = 9).  To make your work look professional, do not ignore the finer details. Take the Pen Tool (P) and create a shape at the place of the vein junction, as shown below. Fill this shape with the same radial gradient as the one for the veins.  Now create a resemblance of the play of light on the edges of the veins. Copy the vein shape and paste it in back. Change the color of the copy to yellow (C = 0; M = 26; Y = 100 and K = 0) and move the shape slightly to the left.  Step 11Let’s proceed to the leaf texture. Let’s choose a leaf for a texture copy. The fresh leaf of any tree is suitable. A leaf size should be approximately 3 inches, light streaks should be well seen through the dark green background. The leaf should be flat. If it is not flat, we will have to cover it with glass. I used for it what I had and it was a cover of a box for compact disks (note: it should be new without scratches).  Step 12How to take a close up photo of streaks of a leaf. A leaf photo is taken through passing light. A leaf is between the camera and the light source. Milk plastic with the thickness 3-4 mm (which is used for shining advertising) can be used as frosted glass. It diffuses light equally. I used a DSLR camera, a set of rings for macro photography and a flash with distance control. It is not always necessary; you can use any camera with macro photography. And any source of light with the power not less than 100 W. A camera should be put on a tripod in order to receive an image without blur which might appear after a long exposure. If you have a scanner with the function of a film scanning you can do it without a camera by scanning a leaf in a regime of film scanning. In some cases you can stick a leaf on window glass with scotch tape on a sunny day and have a leaf picture taken from the side of a room. Through one of these methods we have to get such an image.   Step 13Let’s look at the photo process and its printing. The texture should be printed in an A4 format. Open the photo in Photoshop. Draw up an inventory of an image in order to reduce the paint consumption – go to Image > Adjustment > Invert. Then go to Filter > Sharpen > Unsharp Mask for clarity and display the results as on a screenshot. Save a file. Now our image is ready for printing. Print it in a format A4, photo quality is preferable.   Step 14Cover our printed leaf with tracing paper in an A4 format, and draw the most distinctive lines with the help of a liner pen in order to form closed outlines. To do it more naturally you can use liner pens of different thicknesses. Optimal thickness of a line is about 1mm.  Step 15Put the tracing paper with a drawing of our texture into a scanner; scan it in Grayscale not less than 300ppi. Open the image in Photoshop. The image should have only two shades – Pure Black and Pure White. If there are unnecessary shades in the scanned image, take them away with the help of instrument Levels. Then go to Image > Adjustments > Levels, move sliders in such a way as it is shown below. Now our image contains a pure black picture on a pure white background without gray shades. If it is necessary delete incidental spots with the help of the Eraser Tools. Save the file. Now our texture is ready for vector tracing.   Step 16Switch on Illustrator, create a new document and put our image inside it. Go to File > Place and choose the file where texture is. Choose the image when it appears and go to Object > Live Trace > Tracing Option. Change the parameters Preset and Max Stroke Weight as shown. The other parameters are left without any changes. Press Trace. Go to Object > Expand.  Step 17We have got a vector image with the same picture of leaf veins. It consists of accurate lines of the same width. But each line is a separate unclosed Path. Transform an image into closed Path which can be easily edited. Select the image and go to Object > Path > Outline > Stroke.   Keep the object selected press the button Unite from a palette Pathfinder. Now we have a texture which is Compound Path.  Step 18The obtained texture has a lot of extra points. It is desirable to reduce their quantity, to do this select the texture and go to Object > Path > Simplify and set the values in the dialog box, as shown below.  The number of points was reduced almost by half, at the same time the texture has not lost its shape. However, there appeared a little challenge for us – we have got knots in the corners of the texture. It is better to get rid of these knots, take the Delete Anchor Point Tool (-) and click with the mouse on the knots in the corners. This is a meticulous job, well, what can you do about it? Imagine that you are knitting laces  Step 19The obtained texture is not big enough to cover the whole leaf.  Therefore, let’s create an infinite leaf texture. Give special attention to the following steps, as you will be able to use this technique to create any seamless texture. First, trim the texture so that its edges could lie on the horizontal and vertical lines only. Take the Rectangle Tool (M) and create a rectangle with no fill with 1 pixel stroke. It would be better if the sizes of the rectangle were expressed by integers.  Select the rectangle and the texture, and click Crop from the Pathfinder palette.  Step 20As a result of these actions we have got a lot of unnecessary items. Let’s clean up the texture. Keep the texture selected, go to Object > Path > Clean up… Now find the Compound Path in the Layers palette. Keep just one from the entire set of objects. Lock the under layer with the Compound Path and hit the Delete button.  The Compound Path is located in a group, so ungroup it (Shift + Command + G). Step 21Well, I got a clean leaf texture 185 by 120 pixels in size. Turn this texture into a seamless one. Select the texture and go to Object > Transform > Move… set the values in the dialog box so that the texture was moved by 120 pixels horizontally down, and click the Copy button.  Lock the under layer with the lower texture in the Layers palette. We will only edit the original texture. Step 22Increase the area where the textures contact with each other and start editing the lower edge of the original texture so that the lines of the original texture continue in the lower texture.   Do it by editing the whole original texture down at the lower edge. Tools needed: the Direct Selection Tool (A) and Lasso Tool (Q). Now unlock the lower texture and delete it, we needed it as a template only. Step 23Select the original texture and go to Object > Transform > Move… set the values in the dialog box to move the texture horizontally up by 120 pixels, and click Copy. Lock the under layer with the upper texture in the Layers palette.  Edit the original structure, removing unnecessary elements. Tools needed: the Direct Selection Tool (A) and Delete Anchor Point Tool (-).  Do it by editing the original texture down the entire upper edge. Edit the right and left edge of the texture using this technique. Step 24We have achieved an element of seamless texture, now you can drag it to the Swatches palette and use it as a fill.  In our artwork though the texture will be used as a separate object. Using the original item and the Move command from the menu Object > Transform, copy the texture as many times as needed in order to achieve a group of objects of the size slightly larger than the leaf size.  Step 25Now select all the elements of texture and click on Unite from the Pathfinder palette.  Unlock and make the leaf shape visible (see step 5), then move it above all the objects.  Select this leaf shape and the texture, click on Crop from the Pathfinder palette. Fill the texture with a solid yellow color (C = 10; M = 42; Y = 100 and K = 0).  Step 26I believe that the leaf looks a little flat.  Create creases on its surface and the play of light on its edges. Select the part of the leaf that we are going to work on, and go to Object > Expand. Now select the Gradient Mesh in the dialog box.  Add points to the gradient mesh using the Mesh Tool (U), control the mesh lines using the Direct Selection Tool (A). Pick colors directly from the object that is being edited using the Eyedropper Tool (I).  You can find tips on mesh objects in my tutorials: How to Create a Fancy Gift Bow using Adobe Illustrator; Quick Tip: How to Tame the Gradient Mesh. By doing it this way, transform the leaf to the view as shown in the figure below.   Step 27Take the Pen Tool (P) and create the tip of the leaf, fill its shape with a linear gradient, consisting of seven colors: 1 (C = 14; M = 45; Y = 70 and K = 3); 2 (C = 15; M = 68 ; Y = 43 and K = 4); 3 (C = 20; M = 100; Y = 78 and K = 12); 4 (C = 0; M = 52; Y = 12 and K = 0); 5 ( C = 27; M = 68; Y = 40 and K = 17); 6 (C = 32; M = 34; Y = 65 and K = 16); and 7 (C = 17; M = 15; Y = 78 and K = 2).  Step 28Using the technique described in step 26, transform the gradient fill into a Mesh object. Edit the mesh lines so that they can repeat the shape of the tip, but do not overlap it. Edit the colors of the extreme points of the mesh in order to add more volume. In order to get darker tones on the left, move the slider to the right while holding down the Shift in the Color palette. For brighter tones on the right, move the slider to the left while holding down the Shift key in the Color palette.  Step 29Create the shape of the leaf shadow on the tip, and fill it with a linear gradient consisting of two colors: 1 (C = 15; M = 68; Y = 43 and K = 60) and 2 (C = 15; M = 68; Y = 43 and K = 4).  Step 30Using the Ellipse Tool (L) create an ellipse on the tip of the leaf and deform it using the Direct Selection Tool (A). Fill this form with a radial gradient, consisting of two colors: 1 (C = 31; M = 34; Y = 65 and K = 16) and 2 (C = 16; M = 15; Y = 78 and K = 2).  Step 31Create a water drop on the leaf. Take the Ellipse Tool (L) and create an ellipse. Deform the ellipse using the Direct Selection Tool (A) so that we could get the shape as shown in the figure below. Fill this shape with a radial gradient that goes from a white to white color with 0%.  Copy this shape and paste it in front. Replace the gradient of this shape with a radial gradient that goes from an orange color with Opacity 0% to a solid orange color.  The color of this gradient depends on the color of the object on which the drop lies. You can pick the basic color of the object using the Eyedropper Tool (I) and make it darker by adding a black color to the Color palette (I’m using the CMYK color model). Now apply this color to the gradient. Step 32Create a highlight on the drop. Take the Ellipse Tool (L) and create an ellipse. Deform the ellipse using the Direct Selection Tool (A) so that we obtain the shape shown in the figure below. Fill the shape with a linear gradient that goes from white with 70% Opacity to a white color with 0% Opacity.  Step 33Create a light source reflection in the drop. Create two circles using the Ellipse Tool (L). Fill both circles with a white color, make the bigger one look transparent. Select both circles and go to Object > Blend > Make.  Step 34Create a shadow of the drop. Take the Pen Tool (P) and create the shape of the shadow. Now copy the shape of the drop and paste it in front, select both the drop and shadow shapes, hit the Minus Front from the Pathfinder palette. The shadow of the drop is not going to be smooth, so fill it with a radial gradient that goes from a white color to an orange color with an Opacity of 56%.  Create a few more drops by duplicating the drop and changing its sizes.  Step 35A background made of shades of a green color will create higher contrast. I created the background using the Mesh Tool (U).  ConclusionThere you have it, an Autumn Leaf. Applying the created universal texture of a leaf you can do your own leaves more realistically. I hope you’ve enjoyed this tutorial. |
| You are subscribed to email updates from Vectortuts+ To stop receiving these emails, you may unsubscribe now. | Email delivery powered by Google |
| Google Inc., 20 West Kinzie, Chicago IL USA 60610 | |

 留言列表
留言列表